Linux on Chromebox
I wanted a small x86 machine to have running 24/7 with some services on it as my Raspberry Pi 3 was a little underpowered. I looked around on ebay and while NUCs still command higher prices I saw some Chromeboxes available. I ended up with a HP Chromebox G1 (HP Chromebox CB1-020NA) for £54. I’m happy with this, the exact same price as a 4GB Raspberry Pi 4 but more flexible and powerful, also includes it’s own power adapter and storage.
| CPU | Intel Celeron 2955U 2C @1.4GHz |
| RAM | 4GB DDR3L |
| GPU | Intel HD graphics 4400 |
| Disk | 16GB SSD |
| Price | £54 |
My first searches for Linux on a Chromebook pointed to Crouton, but this is running ChromeOS alongside Linux which was not what I wanted. Further searched brought up GalliumOS which is full Linux based on Ubuntu 18.04 but customised specifically for ChromeOS hardware. There is another dual booting option called chrx but as that’s not what I wanted I also ignored it.
Importantly the HP machine is listed on the Hardware Compatibility for GalliumOS. Knowing the hardware codename ZAKO helped when looking through the documentation as this is how the site refers to all machines.
Alongside GalliumOS I would be using MrChromebox.tech for custom firmware and utilities. Strictly speaking custom firmware may not have been needed but was listed as recommended. It corrects a listed factory bug in the original firmware with USB ports in the alternative legacy boot mode way to install Linux.
Installing Linux
Disable firmware write protect
The machine needed to be put in to developer mode to enable the writing of custom firmware and installation of the new OS. For this machine this required removing an internal screw (easy). I found a guide for this which was originally on kodi.wiki but since has been deleted so I have replicated below:
With the device powered off and unplugged:
- Remove (4) rubber feet from bottom of unit
- Remove (4) screws under rubber feet
- Take off the bottom cover. Tip: Thread two of the screws that you just removed into the VESA mounting holes, and use them to pull/separate bottom cover.
-
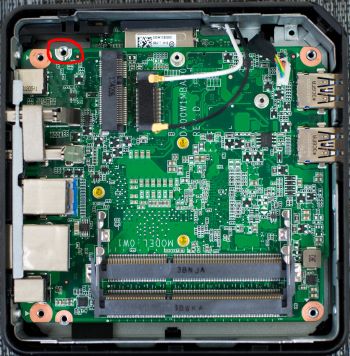
Remove write-protect screw circled below:
- Reassemble in reverse order
Important: The write-protect screw should be left out permanently.
Enable developer mode
A guide for this is provided by GalliumOS wiki. ZAKO shares it’s hardware with an Asus machine PANTHER so you can follow the instructions for it.
Write custom firmware
MrChromebox provides a script which installs custom firmware.
In ChromeOS guest mode I opened a terminal with CTRL+ALT+T and entered shell. Then downloaded and ran the script:
cd; curl -LO https://mrchromebox.tech/firmware-util.sh && sudo bash firmware-util.sh
I chose option 3
3) Install/Update Full ROM Firmware
After that it was straight forward to go through the few menu screens. I took the advice from the utility to backup my old firmware. This only required popping in a USB drive for it to write to, this failed at first but after a reformat of the drive to FAT32 it succeeded.
Source iso and create bootable USB
Download the correct .iso file from the downloads page of GalliumOS. Haswell for this machine.
I tried Rufus at first but even with the correct settings (GPT, UEFI, DD) this was failing to boot for me. Instead I used Etcher which worked first time without any setting changes required. The wiki has a guide if needed.
Install GalliumOS
Getting in to the UEFI of the custom firmware requires the pressing of any key within ~1 second of powering the machine on. Then the boot order can be changed to use your USB first. After that the install process is as easy as any Ubuntu type system.
Summary
I did find some of the back and forth between GalliumOS and MrChromebox documentation a little jarring, leaving me somewhat concerned I might to brick the device. Ultimately after double checking my notes running through all the steps went smoothly.
GalliumOS itself has been great. It boots up fast and uses small amounts of RAM and the limited 16GB SSD. WIFI and Bluetooth both worked out of the box.